
Crochet Reindeer Christmas Ornament: Design, Materials & Assembly Guide
How to plan a crochet reindeer or Rudolph Christmas ornament: components, materials, assembly logic, safety notes, and variations. An editorial design guide, not a tested pattern.
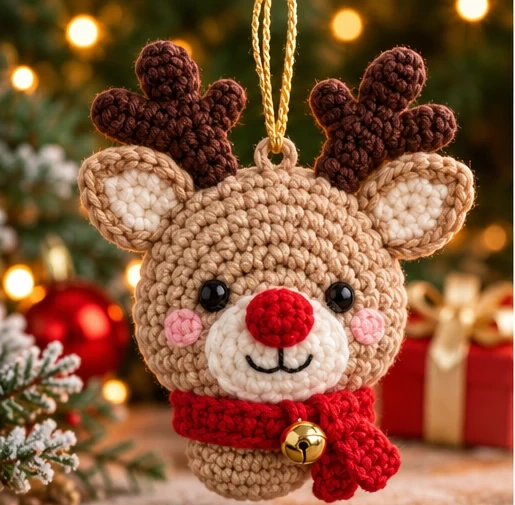
About this guide: The images with this article are illustrative collages we generated to plan this design—not photographs of a physically completed, tested ornament, and not a verified stitch-by-stitch pattern. This is an editorial design guide: it walks through the concept, materials, and general construction approach for a crochet reindeer ornament, without claiming specific row counts or a tested result. If you'd like a fully reconciled, test-stitched pattern with exact stitch counts, that's a separate project we haven't done yet—see the closing note below.
A Festive Reindeer Ornament, Rudolph-Style
A small crocheted reindeer face—round head, two felt-soft ears, a pair of branching antlers, a pale muzzle, and (if you're going the classic route) a bright red nose—is one of the most recognizable shapes in holiday crochet. It reads instantly as "Rudolph" without needing to be literal about it, which makes it a forgiving design to riff on: swap the nose color, the scarf color, or the yarn shade, and you still get something unmistakably festive. This guide is aimed at anyone who's comfortable with basic amigurumi-style crochet (working in continuous rounds, single crochet, simple increases) and wants to plan out a reindeer ornament of their own, rather than follow someone else's row-by-row instructions.
What the Ornament Includes
Broken into components, a design like this is really several small, separately workable pieces joined together:
- Head: a flat or lightly domed circle, worked in rounds of single crochet, in your main reindeer color (tan, brown, or cream).
- Muzzle: a smaller circle or oval in a contrasting pale color (cream or white), attached to the lower half of the head.
- Ears: two small oval or leaf-shaped pieces, often two-tone (an outer color matching the head, an inner color matching the muzzle), attached near the top of the head.
- Antlers: two branching pieces in brown, each built from a main stem with two or three shorter branches—these are the fiddliest part to plan, since the branching means working chains or small clusters off a main stitch rather than a simple round.
- Nose: a small circle, red for a classic Rudolph look or left in the main color for a more neutral deer.
- Eyes: safety eyes or embroidered features—see the Safety section below before choosing.
- Optional scarf or bow, and a small bell: a strip or bow shape in a contrasting color, with a tiny jingle bell sewn on. Entirely optional, and worth reconsidering for some audiences—again, see Safety.
- Hanging loop: a chained loop or a length of ribbon/cord, attached at the top of the head.
Suggested Materials and Tools
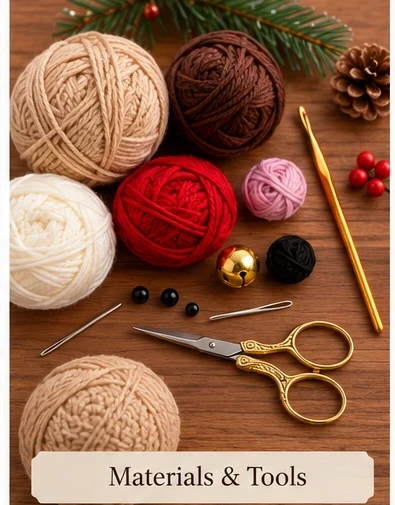
- Worsted weight (US #4) yarn in your main color (tan, brown, or cream), plus small amounts of a muzzle/ear color (cream or white) and a nose color (red, or your main color)
- A small amount of a contrast color for a scarf or bow, if you're including one, plus a tiny jingle bell
- A crochet hook sized for your yarn—check the yarn label's suggested hook size as a starting point rather than a number we'd invent here
- Small amount of fiberfill stuffing, if you want the head to have some dimension rather than lying flat
- Safety eyes, or black embroidery thread and a needle, for the eyes (see Safety below for which to choose and when)
- Tapestry needle and scissors
We're deliberately not giving an exact yardage, gauge, or finished-size figure here. Those numbers only mean something once they've been checked against an actual swatch and a finished piece, and we haven't crocheted and measured this specific design ourselves yet—inventing numbers that look precise but haven't been verified would be more misleading than just saying so.
Design Planning and Component Breakdown
The general construction logic for a design like this is well established in amigurumi crochet, even without us pinning down exact row counts here: each flat or domed piece (head, muzzle, nose) starts from a magic ring or small foundation chain and grows by increasing a set number of stitches per round, spaced evenly, until it reaches the size you want—this is the same logic behind any crocheted circle, from a coaster to a hat crown. The ears and antlers are smaller, worked flat, and don't need the same round-by-round increase logic; they're closer to small individual shapes you build once and attach. The antlers are the one component that benefits from a bit of planning before you start, since "two or three branches off a main stem" isn't a single repeating round—you're working the main stem for a few rows, then starting a new piece of yarn (or chaining off) for each branch at the point where it should emerge, a bit like how a crocheted leaf with veins is built, rather than a straightforward amigurumi shape.
On color: the classic palette is tan or light brown for the head and antlers, cream or white for the muzzle and ear interiors, and red for the nose. A darker brown reads as a more grown-up, less cartoonish deer. A cream-and-white palette throughout (keeping the nose in the main color instead of red) makes a softer, less Rudolph-specific ornament that still reads clearly as a deer.

A note on that image: it's a generated illustration of a plausible build order, not photographs documenting an actual CrochetSmith test-stitch. The general order it suggests—build the head, build the smaller pieces, assemble, then add any trim—matches how a project like this is normally approached, but the specific stitch-by-stitch detail isn't something we're claiming to have verified.
General Assembly Considerations
Once the individual pieces are made, assembly is mostly about placement and secure attachment rather than any additional crochet technique:
- Symmetry first: pin or hold the ears and antlers in place before sewing, and check they're level and evenly spaced from the front before committing. It's much easier to reposition a pin than to unpick a sewn piece.
- Secure joins: whip-stitch each piece on with the same yarn (or a close match), going through both layers with a few extra stitches at the points that will see the most handling—antler bases and the hanging loop attachment especially.
- Stuff lightly, if at all: for a flat ornament, no stuffing is needed. For a slightly domed one, a small amount of fiberfill behind the muzzle and face gives it dimension without making it heavy.
- Hanging loop: attach it at the top of the head, between or just behind the antlers, and reinforce the stitching there—it's the one point that takes the ornament's full weight every time it's picked up or hung.
As with the rest of this guide, we're describing the general approach rather than a specific verified stitch sequence. If you crochet this and find a particular step works differently than described, that's exactly the kind of thing a real test-stitch would catch and we haven't done that step yet.
Safety
Small plastic safety eyes, jingle bells, and beads are a choking hazard. If this ornament will be anywhere a young child or a pet can reach it—on a low tree branch, in a stocking, as a toy substitute—use embroidered features (satin stitch or French knots) instead of safety eyes, skip the bell, and choose a secure, permanent hanging method rather than anything that could be pulled loose or swallowed. Safety eyes are designed to lock in place on knitted or crocheted fabric, but "designed to resist pulling" is not the same as "safe for a toddler to handle unsupervised," and we're not making that claim here. If in doubt, treat this as a decorative object for display, not a toy.
Customization and Variations
Three easy directions to take this, without changing anything about the construction approach:
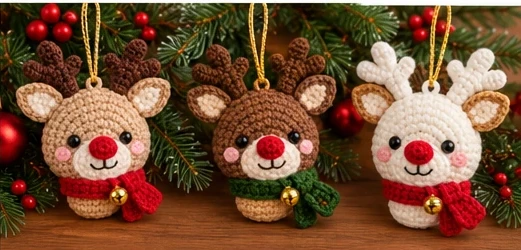
- Classic brown reindeer: tan or light brown head and antlers, cream muzzle and ear interiors, red nose, red scarf.
- Rudolph red-nose version: a slightly deeper brown, the same red nose, and a green scarf for extra contrast against the red.
- Neutral cream variant: cream or off-white throughout, with the nose left in the main color rather than red, for a softer, more farmhouse-style decoration that doesn't read as specifically "Rudolph."
Troubleshooting and Common Pitfalls
The antlers look lopsided or uneven
This is the component most likely to vary between attempts, since branching shapes are harder to keep symmetrical than a simple round. Make one antler, then use it as a physical template (count your exact stitches and row turns) for the second, rather than trying to eyeball a match.
The face looks flat or the features seem randomly placed
Pin every piece (muzzle, ears, nose, eyes) before sewing anything, and step back to look at the whole face from a normal viewing distance—close-up, small placement differences look larger than they are from where the ornament will actually be seen.
The ornament hangs crooked
This usually means the hanging loop isn't centered over the piece's actual center of weight, which shifts once antlers and a scarf are added. Attach the loop after the other pieces are on, and let the ornament hang freely for a moment to check before stitching it down permanently.
Frequently Asked Questions
Is this a tested, downloadable pattern? No. This is an editorial design and concept guide. We haven't crocheted, test-stitched, or measured this specific design, and there's no row-by-row pattern or PDF attached to it.
Will you publish a real pattern for this later? Possibly, as a separate project—but that would need its own stitch-count reconciliation and an actual test-stitch before we'd be comfortable calling it verified, which is more work than this guide represents.
Are the images in this article real photos? No. They're AI-generated illustrative collages used to plan and explain the design concept, not photographs of a finished, tested CrochetSmith piece.
Is this beginner-friendly? The individual techniques (circles worked in rounds, simple shapes, sewing pieces together) are beginner-accessible. The antlers' branching shape is the one part that benefits from some prior amigurumi experience.
Can I skip the scarf and bell? Yes—they're purely decorative and optional, and skipping them (or using embroidery instead of a bell) is the safer choice if young children or pets will be near the finished ornament.
A Design Guide, Not a Tested Pattern
To be clear about what this article is: it's an editorial concept and planning guide for a crochet reindeer ornament, written to help you think through materials, components, and assembly before you start designing your own version. It is not a physically tested, stitch-by-stitch crochet pattern, and we haven't published one here. If a fully verified pattern (with reconciled stitch counts and an actual test-stitch behind it) would be useful to you, let us know—that's a separate, larger project from this guide. In the meantime, our guides to single crochet and increases and decreases cover the core techniques this design relies on, and our Santa Claus crochet ornament guide and layered Christmas tree ornament guide make good companion reads if you're building out a set of handmade holiday décor.